844-533-2303
 Video demo - See it NOW

 YOUR PROJECT, YOUR POWER
YOUR PROJECT, YOUR POWER
YOUR PROJECT, YOUR POWER
YOUR PROJECT, YOUR POWER
YOUR PROJECT, YOUR POWER
YOUR PROJECT, YOUR POWER
YOUR PROJECT, YOUR POWER
$99/mo. This fee will get you all of the bidbld basics. Build unlimited estimates with unlimited customers. Use our trades, templates, and price-book inputs coupled with area measurements calculations to deliver fast and easy estimates. Invite your customers to the bidbld app to bounce bids back and forth until they are 100% dialed in.
There are a handful of A la Carte items like Hover, AI Visualizer, and more that can be purchased as needed.
bidbld does not have a maximum or minimum subscription length. Unlike most subscription services, we aren't here to lock you in forever. Use bidbld for as long as you need to and cancel whenever you want. Once your subscription is canceled, the account will be active for the remainder of the latest pay period. Once time runs out, your account will be locked down until a new payment method is input or the account is reactivated.
All bidbld subscriptions come with 3 users. This means you and 2 other people can be granted access to all of your accounts in either a user or admin level. To add your first two users, see the walk through on How to Add Users.
If you need to add additional users please reach out to [email protected] to discuss potential options.
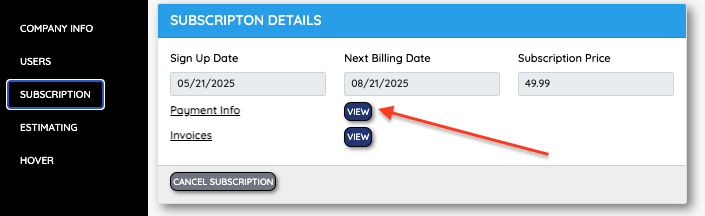
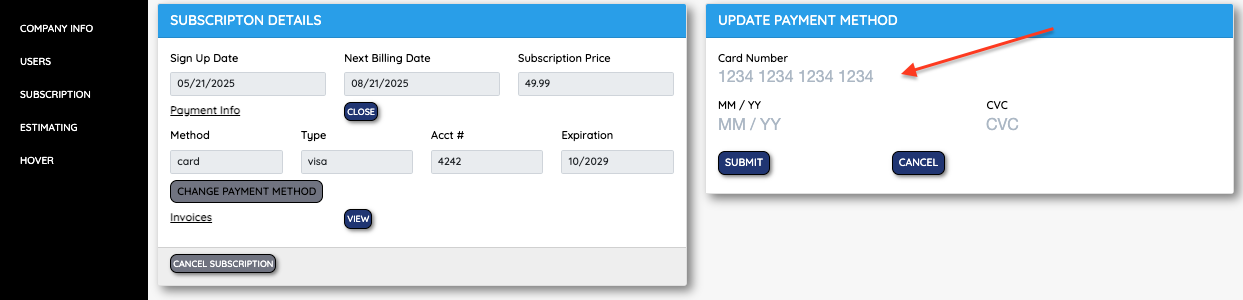
Credits Card numbers change from time to time. bidbld makes it easy to update your subscription billing with a new Credit Card number in just a few clicks.
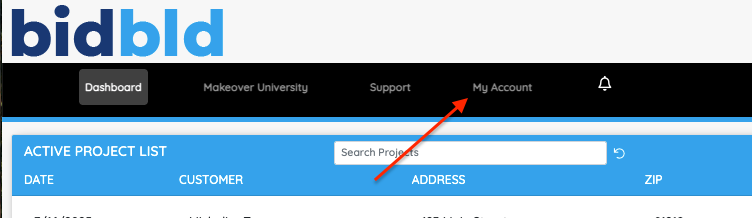
Step #1: Click on the My Account Button.

Step #2: Click on the Subscription tab in the left hand navigation.
Step #3: Find the Payment Info section and click on the View button.
Step #4: Make sure you have your new payment method available and click on the Change Payment button.
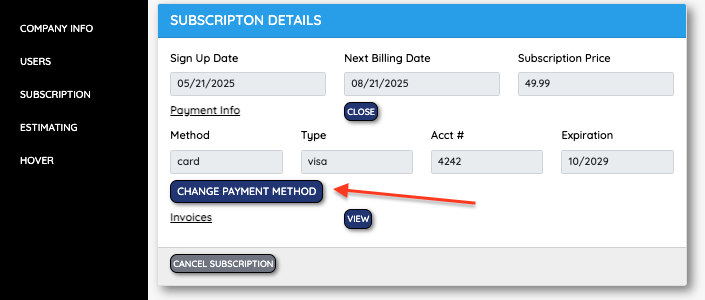
Step #5: Enter your new Credit Card number, expiration date, and CVC pin. Click Submit when complete.
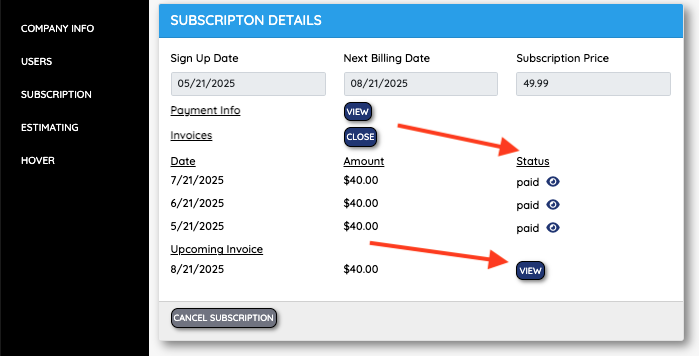
We understand that accounting is important. For that reason, bidbld has made it easy to find, review, and download both your past invoices and your payments to come.
Step #1: Click on the My Account Button
S tep #2: Click on the Subscription tab in the left hand navigation.
Step #3: Find the Invoices section and click on the View button.
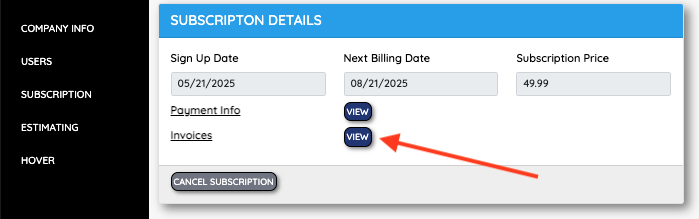
Step #4: Use the eyeball and view buttons to view past and future invoices.
Canceling your membership already? Have you had a chance to get at least one estimate out the door? If you got stuck or had trouble building your first estimate, please check our our resource center, watch videos from our library, or call someone at bidbld support for help.
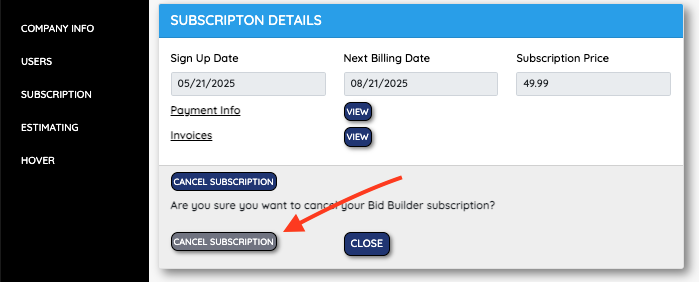
Step #1: Click on the My Account button.
Step #2: Click on the Subscription tab in the left navigation bar.
Step #3: Click on the Cancel Subscription button.
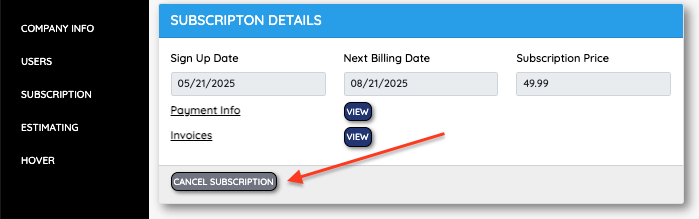
Step #4: Think hard and make sure you want to cancel your subscription before you do it. If you need some help please reach out to a bidbld support member first. We are here to help. Once you confirm the cancelation, your account will remain open for the remainder of the pay period. Once your pay period comes to an end your account and all activity will be locked down until a new payment method is introduced or you reactivate your account.
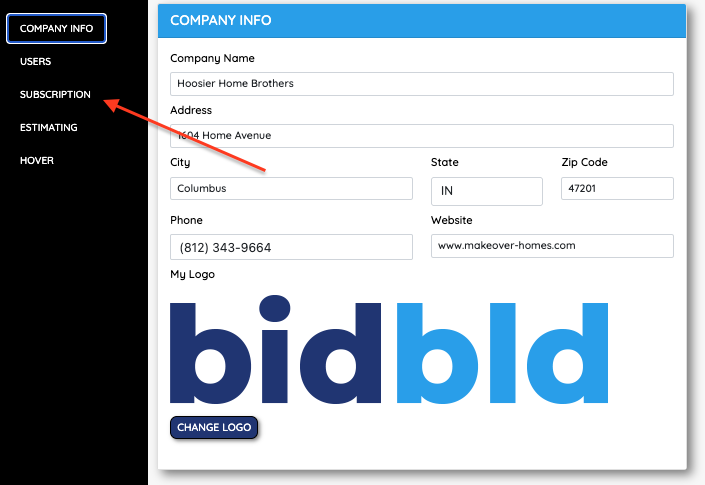
Step #1: Click on the My Account button.
Step #2: Click on the Change Logo button.
Step #3: Click the Browse Button and select a file or Click and Drag your logo.
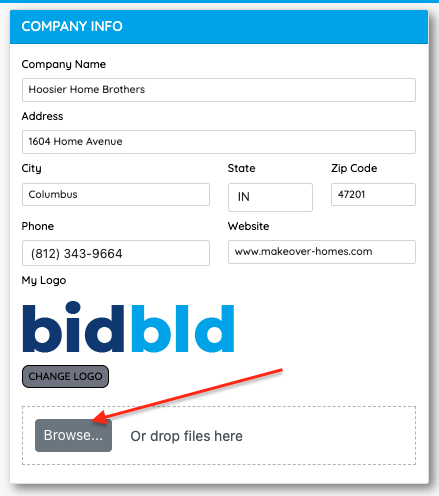
It will Automatically save and be used on bids and other documents from here on out.
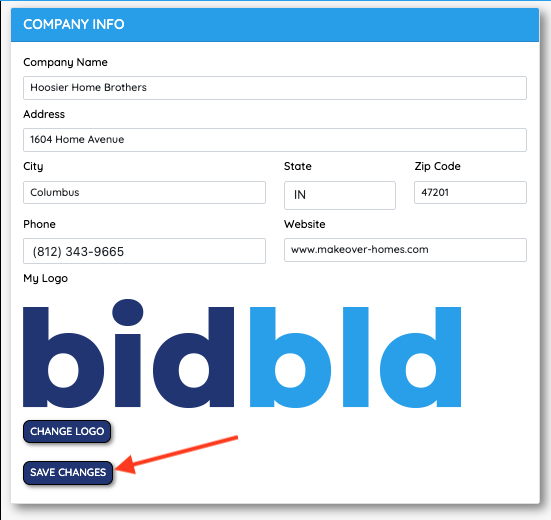
Step #1: Click on the My Account button.
Step #2: Type in your new Phone Number.
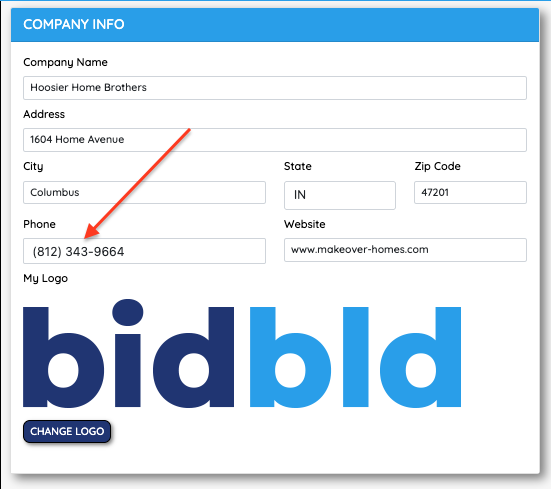 Step #3: Click Save Changes.
Step #1: Click on the My Account button.
Step #2: Type in your new Address, State, and other Information .
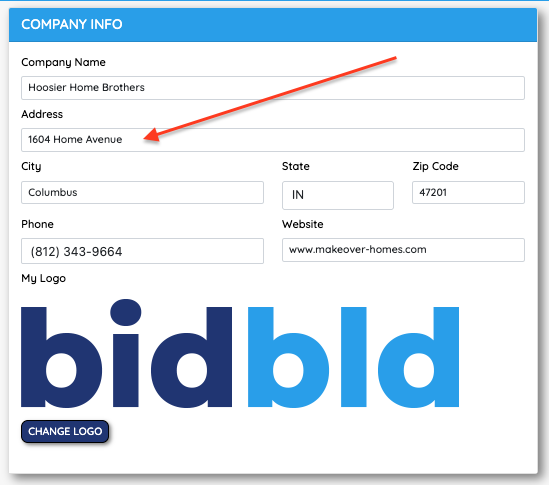
Step #3: Click on the Save Changes button.
Have a small team that you work with and need to grant a few people access to your Bid Builder project? No problem, Bid Builder comes with a total of 3 users. You and 2 users can be added to the account to access and creates bids for your customers.
Step #1: Click on the My Account button.
Step #2 : Click on the Users tab.
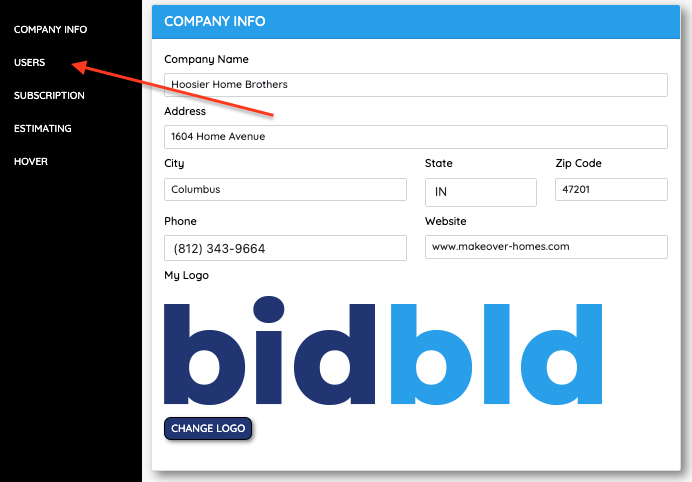
Step #3: Click on the Add User button.
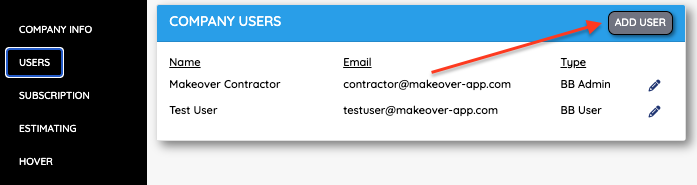
Step #4: Input the new user's Contact Information . All fields must be input to create the new user. Click Add User when done.
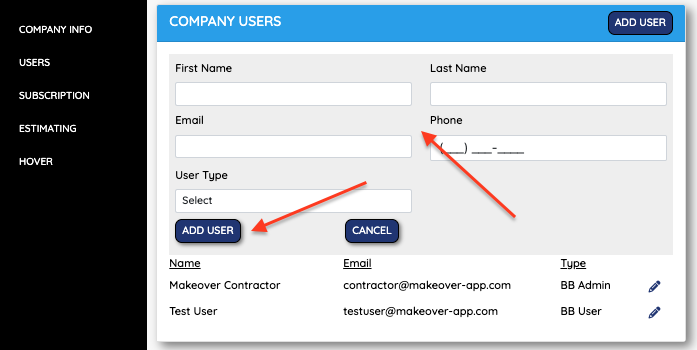
Step #5: Clicking Add User will send an activation email to the new user to Activate their account and get logged in.
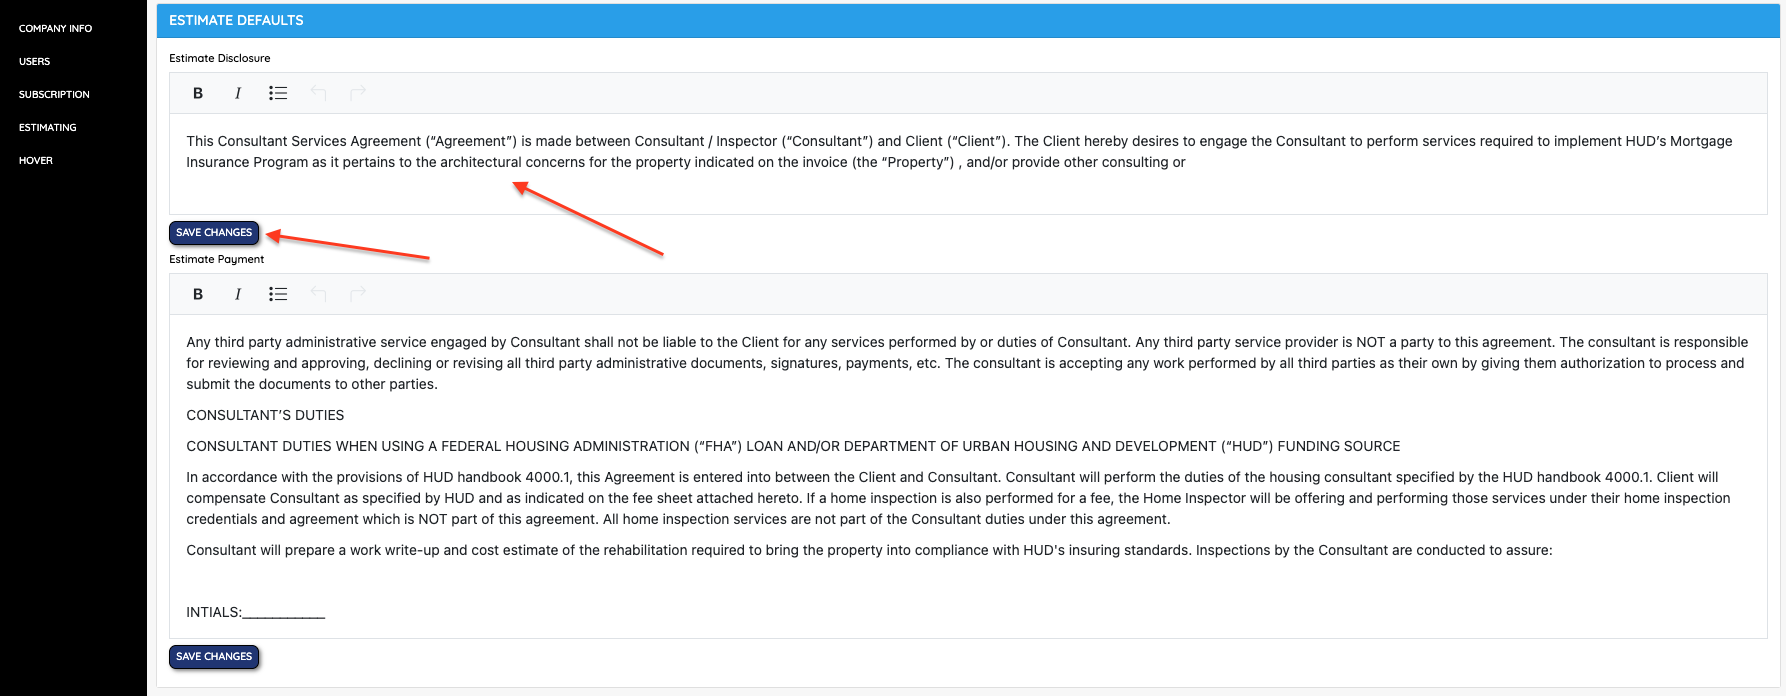
All contractors like to add disclosures and other language to the end of their bid to make sure their bases are covered. Use the disclosures section to add your own custom language to your estimate. This information will be specific to you and you only.
Step #1: Click on the My Account button.
Step #2: Click on the Estimating Tab to open your disclosures.

Step #3: Edit the disclosure you would like to make changes to and click Save Changes .
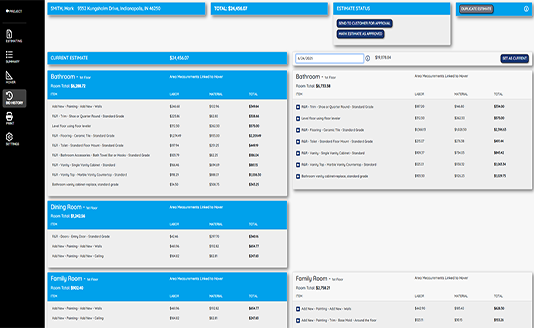
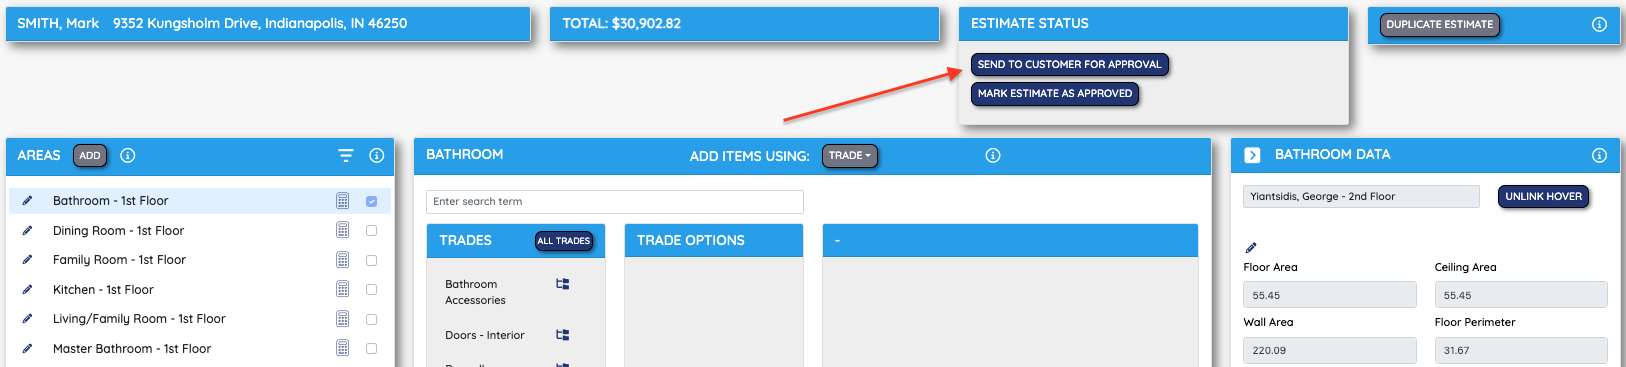
There are actually two different ways that you can use Bid Builder to share your bid with a customer.
Option #1 - Use the Bid Builder system to share your bid back and forth. This will allow the customer to review their bid, make edits, and delete line items. Don't worry, you have to confirm any edits or delete items. This option keeps a good history and paper trail of all edits made to the original bid. You can even make duplicate bids to keep track of past work.
Step #1: Grant your customer Bid Builder Access. Your customer must have a first name, last name, and email address in order to receive the Bid Builder Invitation. Your customer will be sent an email inviting them to login and use the Bid Builder program. It will send them a login and temporary password.
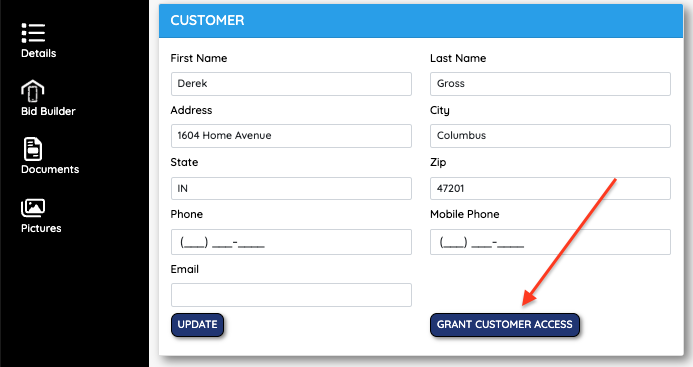
Step #2: Send your Bid to the customer for approval by clicking on the "Send to Customer for Approval" button found in Bid Builder's estimating section. This will send your customer an email letting them know that a bid has been submitted in Bid Builder for them to review. One button click will bring them to Bid Builder.
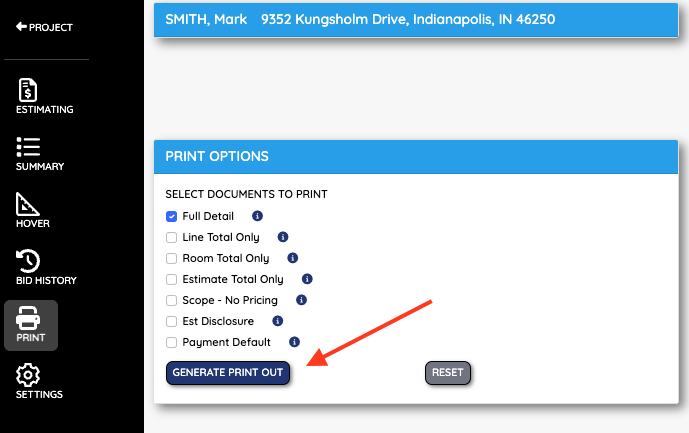
Option #2: Print or Download your Bid and send it to your Customer manually.
Step #1: Click on the Print button found in the left navigation bar in your Estimate.
Step #2: Review and Select the Print option you would like to download. Use the (I) info bubble to get a snapshot of the type of bid you will be printing. Select the type of print out you want and press Generate Print Out.
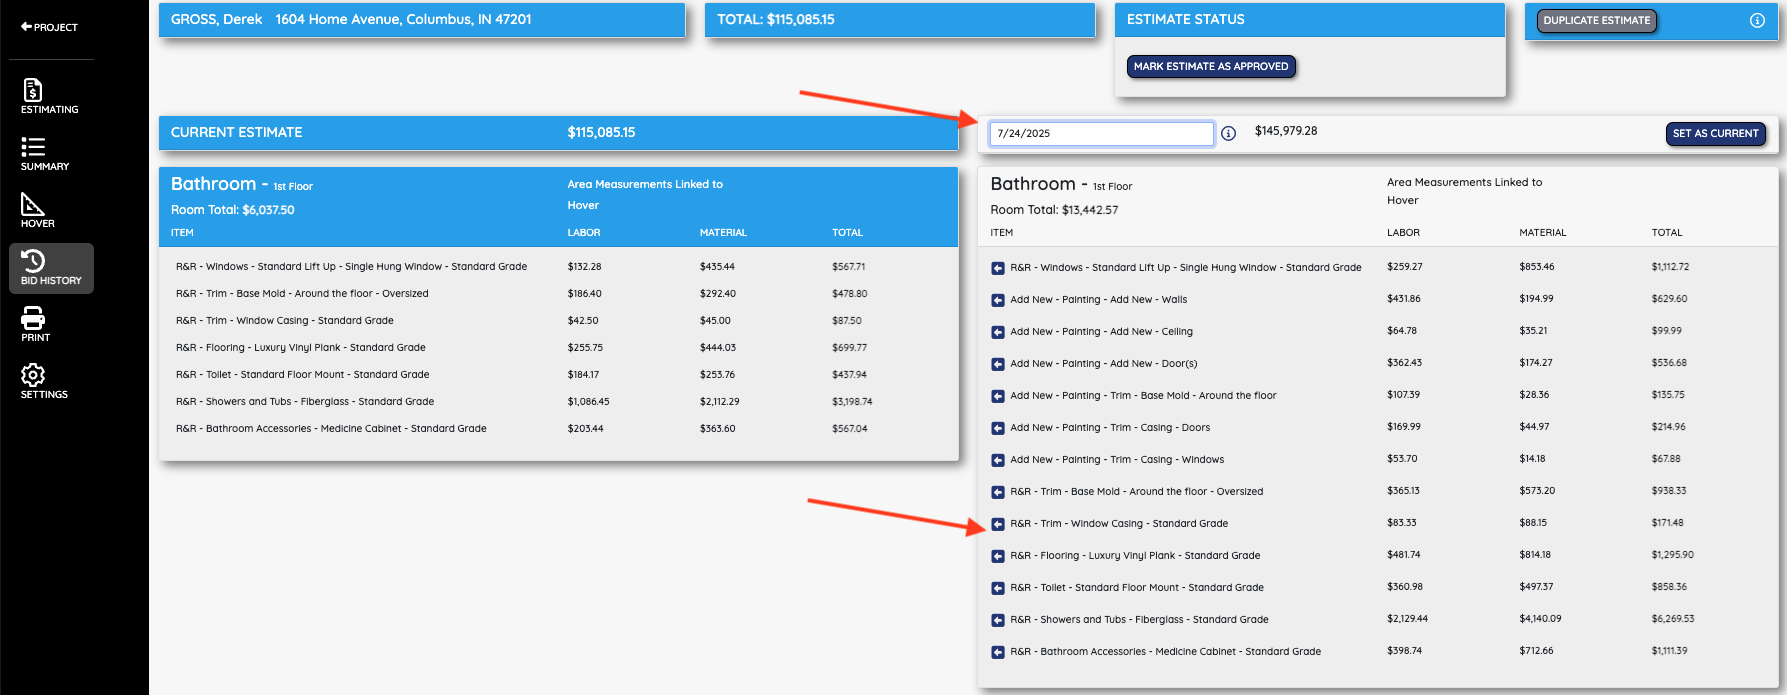
Yes you can! We know that customers change their mind or sometimes decide to go a different route all together. There will be times when you want to save an old estimate and work on a new one or make a duplicate and just make some changes. Using the duplicate and Bid History features you can copy a current bid, work a new one, and then refer back to past bids when needed.
Watch this short Video or follow the instructions below!
Step #1: When viewing your bid - Click on the Duplicate Estimate button. This will save your current bid into the Bid History for you to review later.

Step #2: To view older bids - go to the Bid History tab in the left-hand side bar. Here you can view and select older bids to compare the current estimate to.
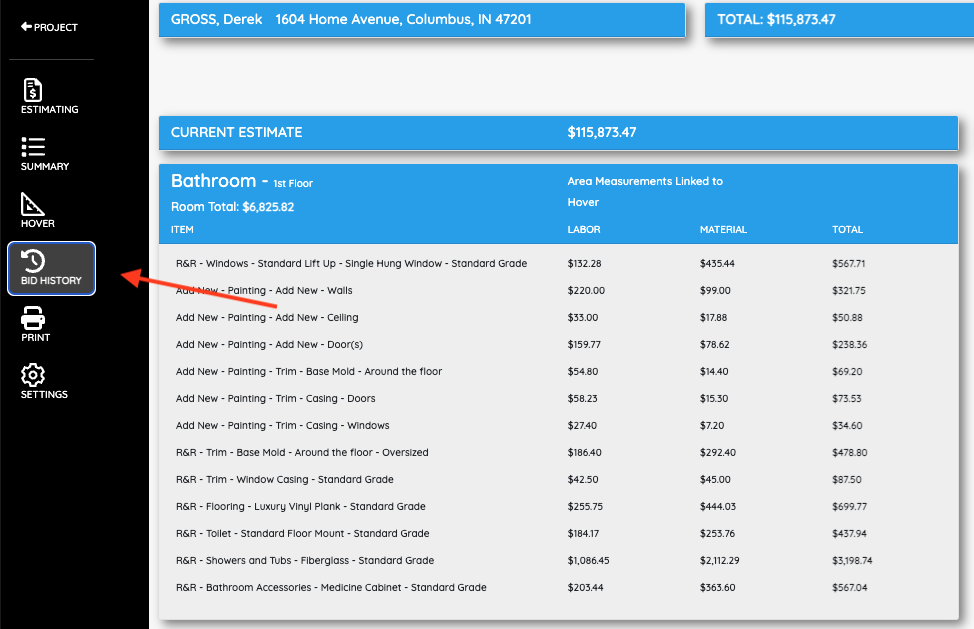
Step #3: You can even add line items from previous bids back into your current bid by clicking on the arrow. This will throw your line item from an older bid back into a current bid.
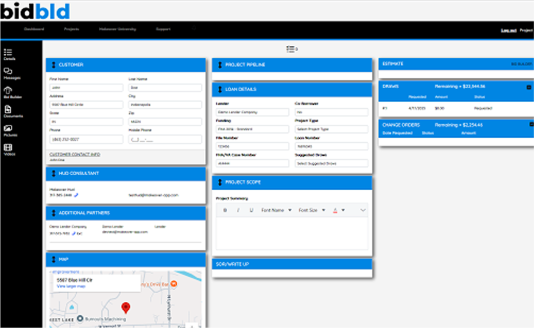
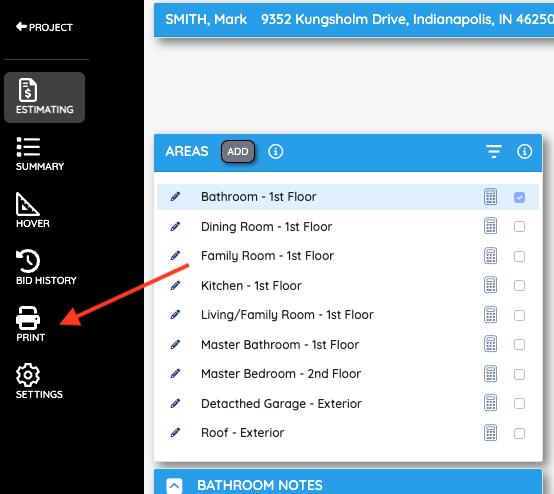
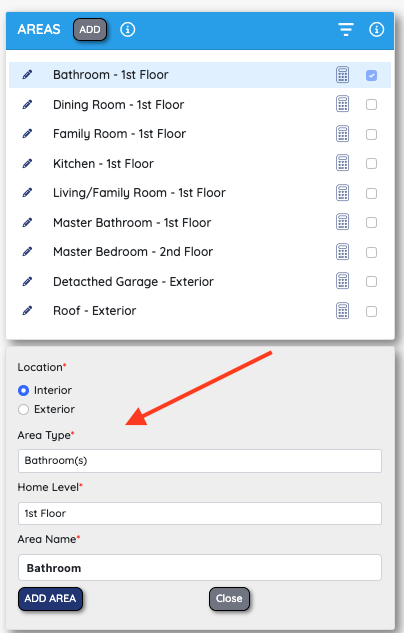
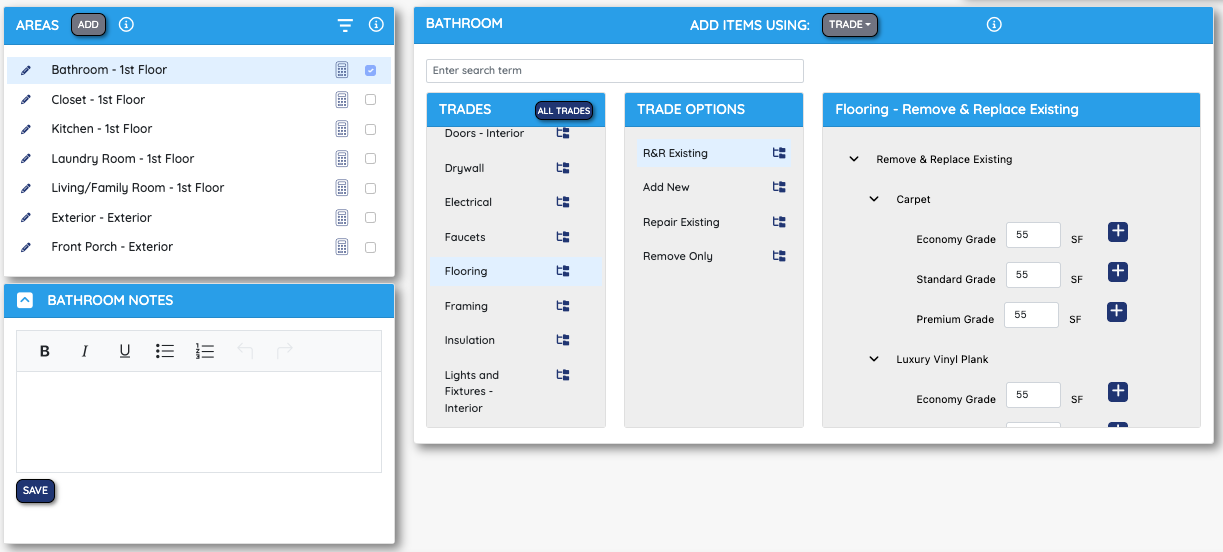
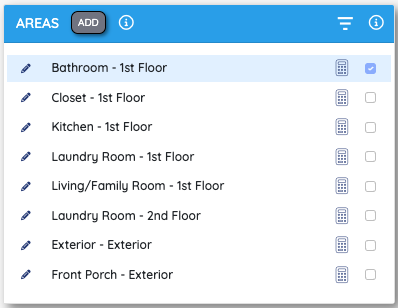
Adding areas to your bid is essential to creating and organizing an accurate bid. Bid Builder allows you to add both interior and exterior areas to create a very, easy to understand, bid for you and your customer.
Watch this short video on Adding New Areas!
Step #1: Adding more Areas to your Bid is simple. Simply Navigate to your Estimate and click on the Add button next to your Areas section.

Step #2: Select a few inputs. Interior vs Exterior. Select the area type which will play into templates and trades later. Select the level of the home that the area is on for bid organization. Finally, name the new area so that you and the customer understand which area you are referring to. Click Add Area when done.
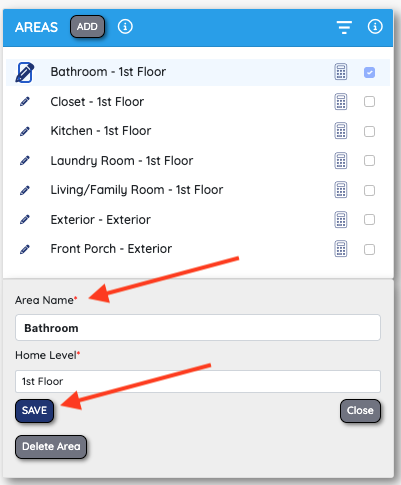
Step #1: In your bidbld Estimate - Click on the Pencil icon to open that area's options.

Step #2: Update the name of the area or change the area's level. Once done click Save to finish your Name Update.
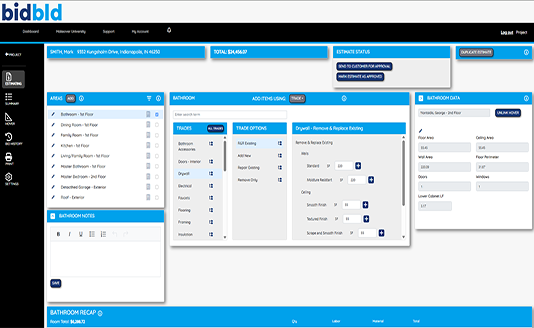
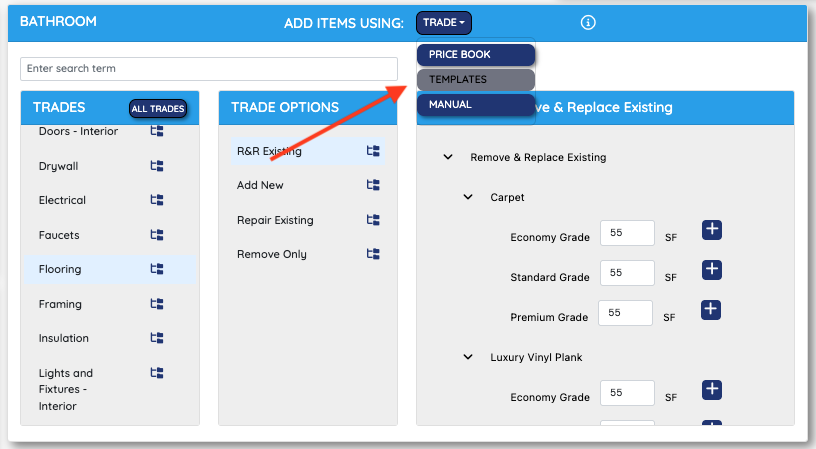
bidbld allows its users to add line items to their bids in a handful of different styles. Choose the style that is best for you and customize the estimating experience as much as you can.
Step #1: Make your way to the estimating section of bidbld and select the Area you'd like to work on.
Step #2: Decide which style of input you would like to use. bidbld offers 4 different options. You can input bids with Bid Builder Narratives, the Price book, Custom Templates, or Manual entries.
|
Bid Builder Narratives |
Zip Code Specific Price Book |
|
|
|
|
Custom Templates |
Manual Entry |
|
|
|

Step #3: Once you've chosen a Bid input style, use the + button to add line items as needed and when ready. For more help learning how to use each style on line item input, click on the (I) info icon and watch the short explainer video.
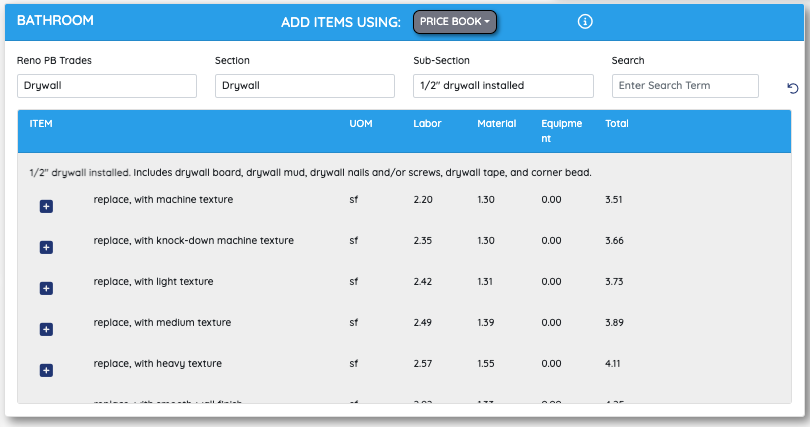
bidbld uses a price book created by Craftsman. Craftsman is a national construction cost and estimating syndicate. They gather pricing information from all types of contractors and sub contractors nation wide and compile average costs across the board. Craftsman collect and filters data by the zip code so you can be sure the estimating costs being presented are being derived from other contractors and subs in your immediate area.
bldbld's Trade Narratives act as shortcuts to access this giant database without all of the sorting and filtering. We've done the hard part for you.
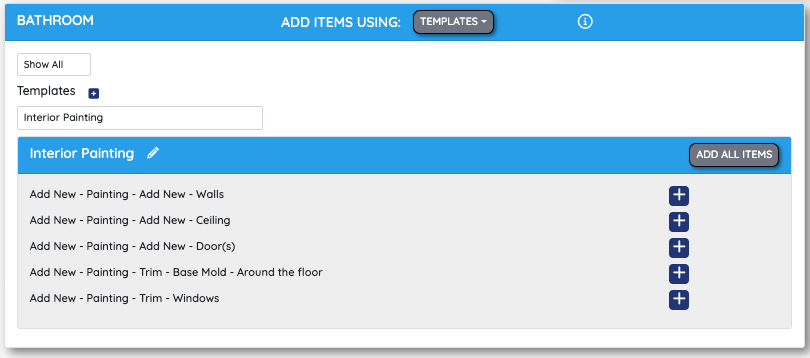
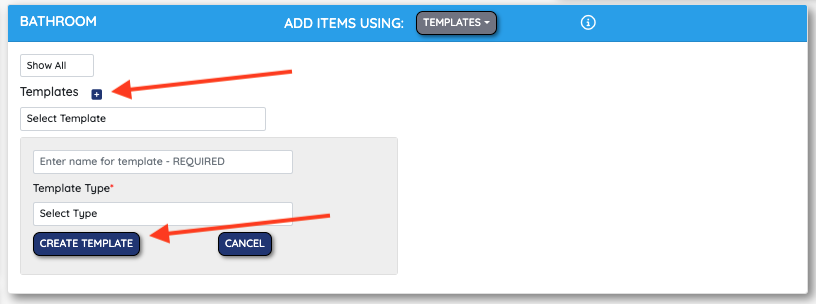
Creating custom templates is going to be one way to quickly speed up your bid creation. You can create as many custom templates as you'd like and use them across all areas of your bids. Templates can be used when you find yourself entering the same types or stacks of line items over and over again for every project.
Watch this shot Video or Follow the Steps Below
Step #1: Go into the estimate section and select an area. It does not matter which area you select.
Step #2: Use the Trade Narratives and Pricebook to create the line item stack you would like to become your custom Template.
Step #3: Select Template from the line item drop down.
Step #4: Click the + Button to create and name and select the area type for your new Template. Click Create Template when ready.
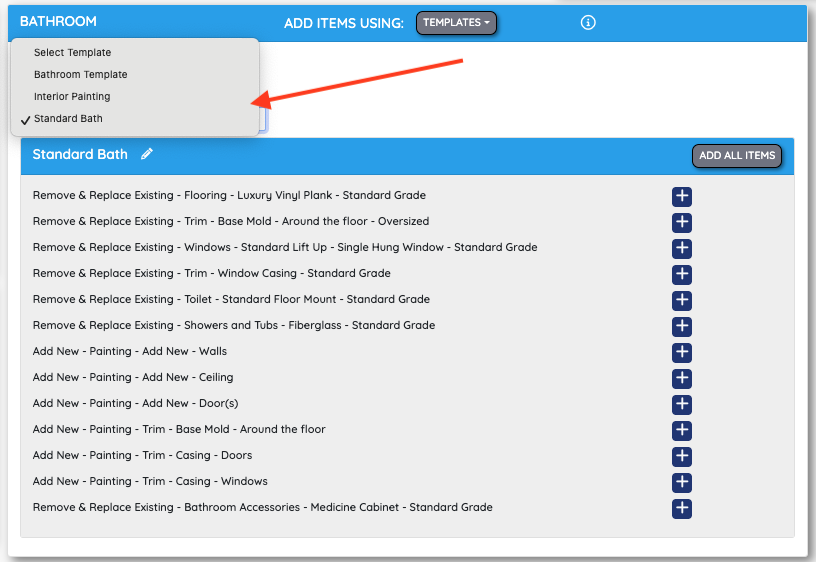
Once a template is created you may select it to be used at any time from the templates drop down menu.
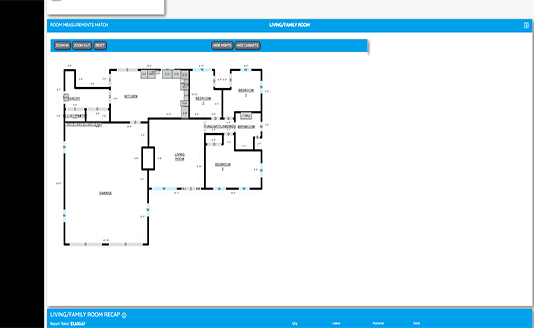
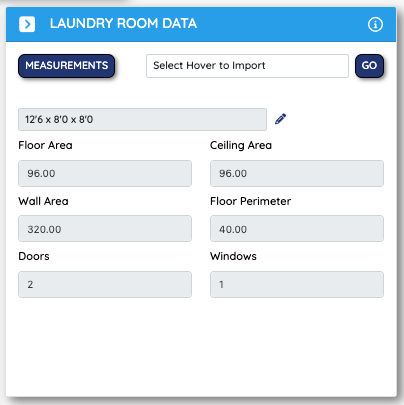
Adding measurements to an area is essential to the bidbld estimator. bidbld's templates and trades will use your Area's measurements to automatically adjust quantities for most of your line items. bidbld will auto input sqft of walls, sqft of the ceiling and floors, lnft of the perimeter of the room and more.
Watch this short Video or follow the Steps below!
Step #1: Select the area you would like to Add Measurements to and click on the Pencil in the Measurements section.
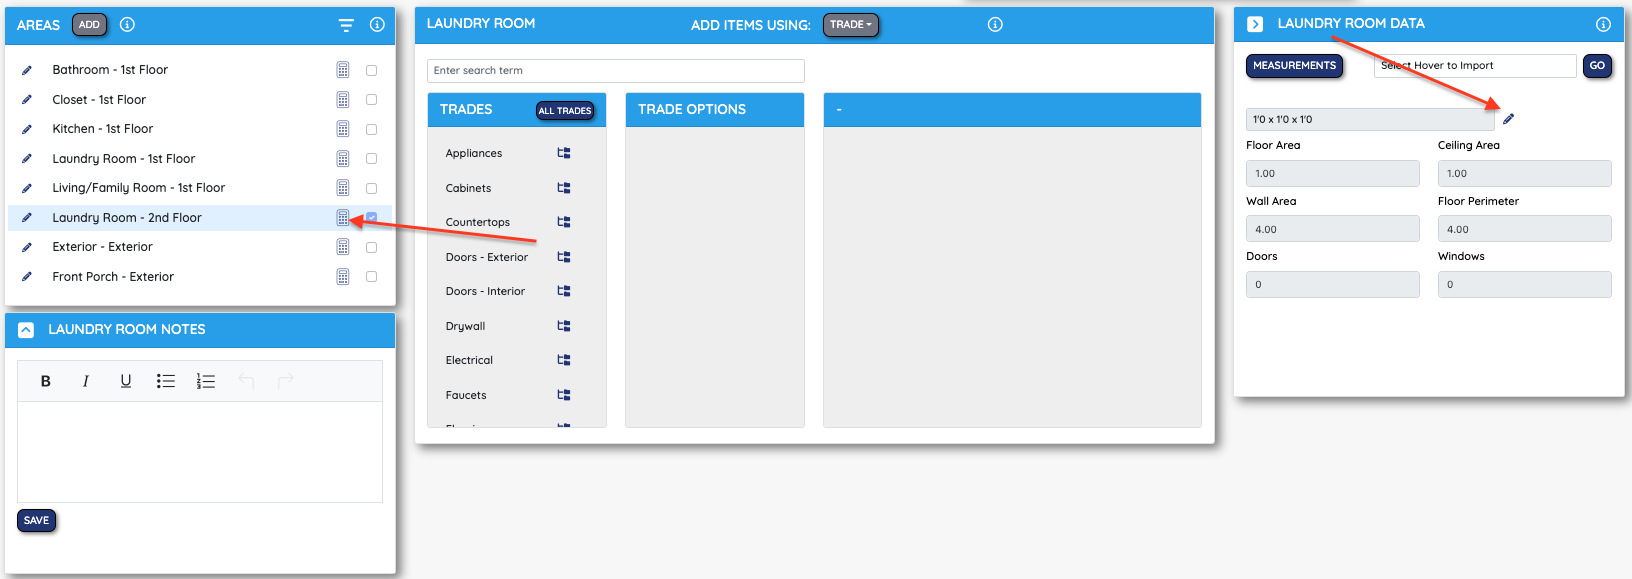
Step #2: Input the area's length, width, height, number doors, and number of windows. You can add an offset if needed. Press Save to confirm measurements.
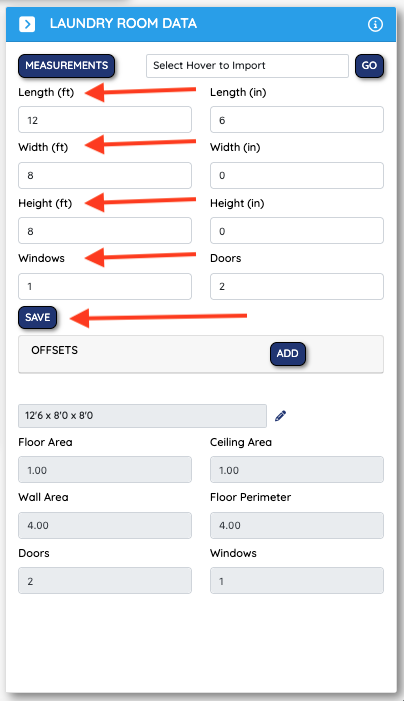
The area's measurements will be made viewable for reference and will automatically be used to create your bid. To edit the area's measurements you can click on the pencil, edit the entries, and press Save.
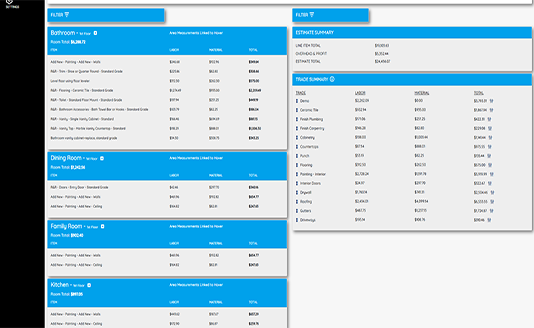
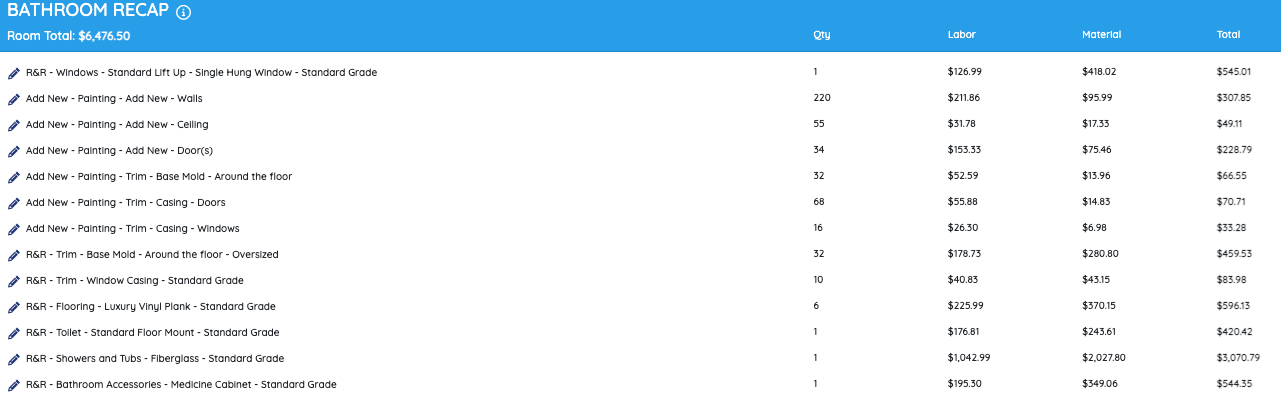
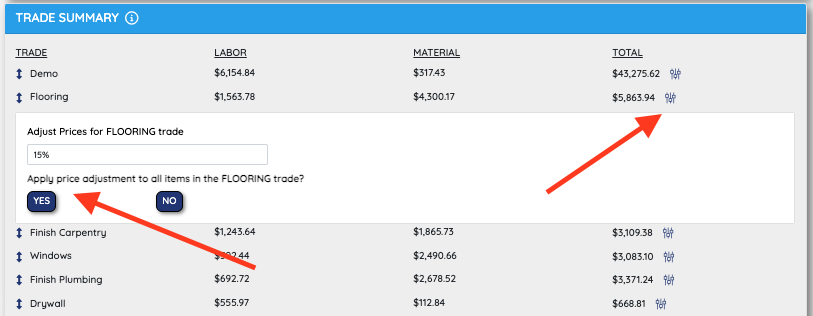
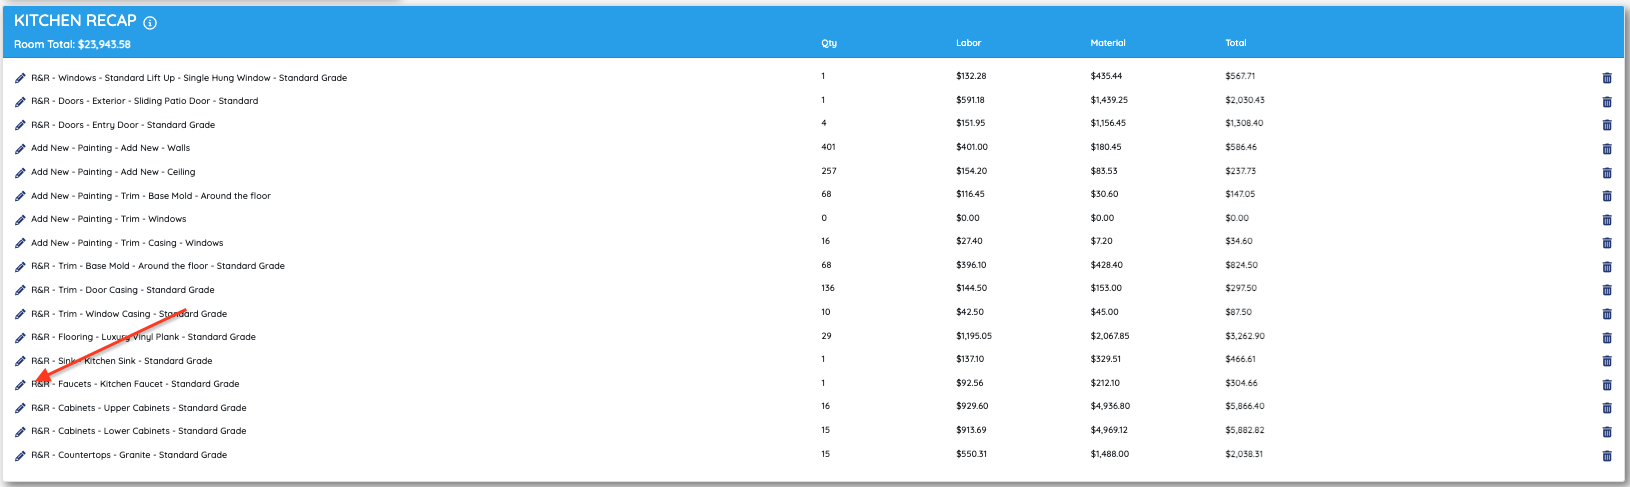
There will be times when you get a number from your drywall, or paint, or electric sub and might want to adjust the entire bid in a single trade category. This can be done on the summary page under the Trade Summary section. If your floor guys give you a bid for $6000 - you can adjust your floor line items to ensure you can get them paid and make some money on top.
Watch this short video or follow the instructions below!
Step #1: Go to the summary page and review the Trade Summary section. Here you will find your bid broken down into trades. You will be able to review the total cost of each trade and see each line item that falls within that category.
Step #2: Find the trade you would like to edit and click on the Adjust button. Adjust the pricing by percentage and click Yes when ready. You can adjust as many times as you need until you get to a number you like.
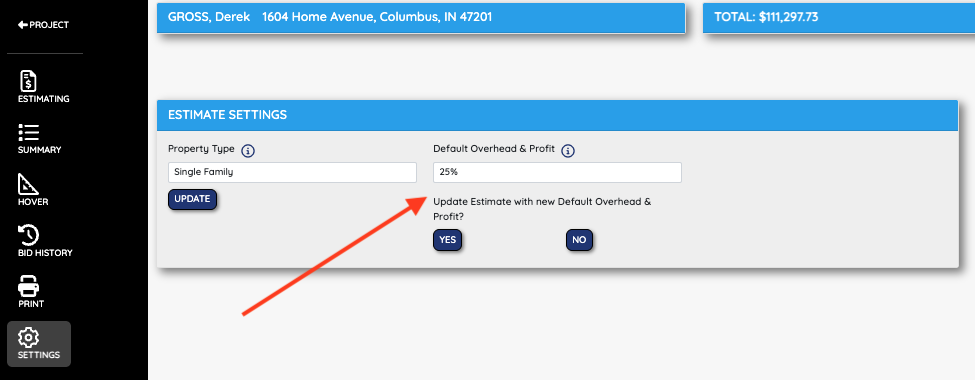
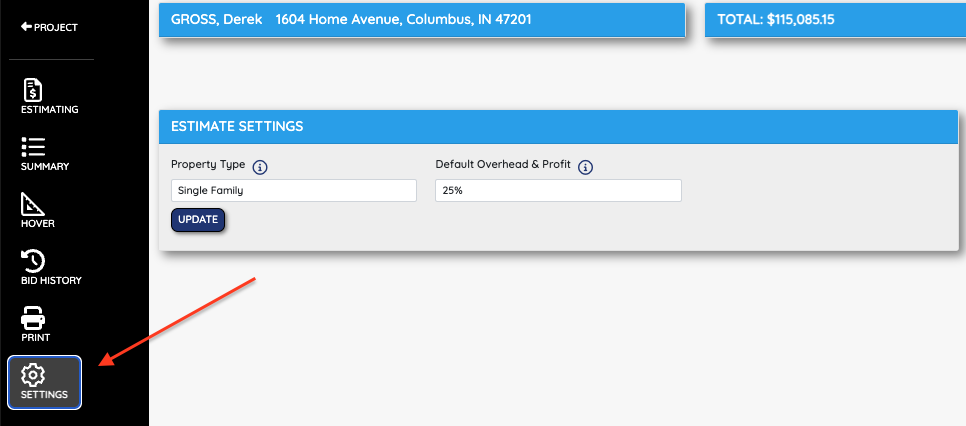
Every job is different. For this reason, you are able to adjust your O&P or Overhead and Profit for each individual job based on your own criteria. Sometimes we want to charge a bit more for small jobs or maybe jobs that are far away. Other times, we want to charge less for easy jobs or maybe jobs done for friends and family.
Watch this short video or follow the steps below!
Step #1: Click on the Settings tab in the left hand navigation bar.
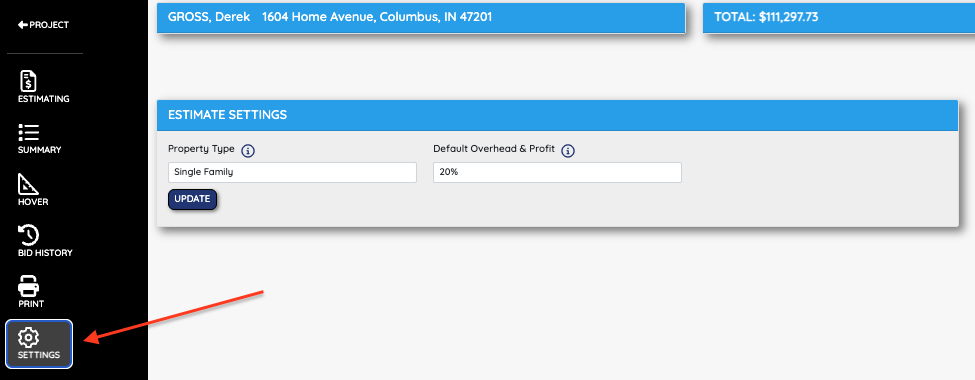
Step #2: Adjust your O&P percentage to where you need it to be and press Yes to update your entire bid with the new O&P breakdown.
Yes, as long as you have an active account, you will always be able to log into and review old projects, customers, photos, and bids.
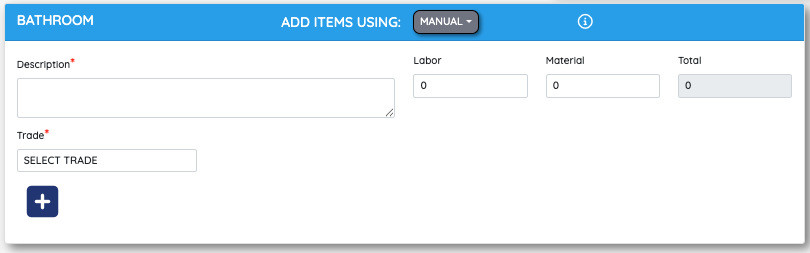
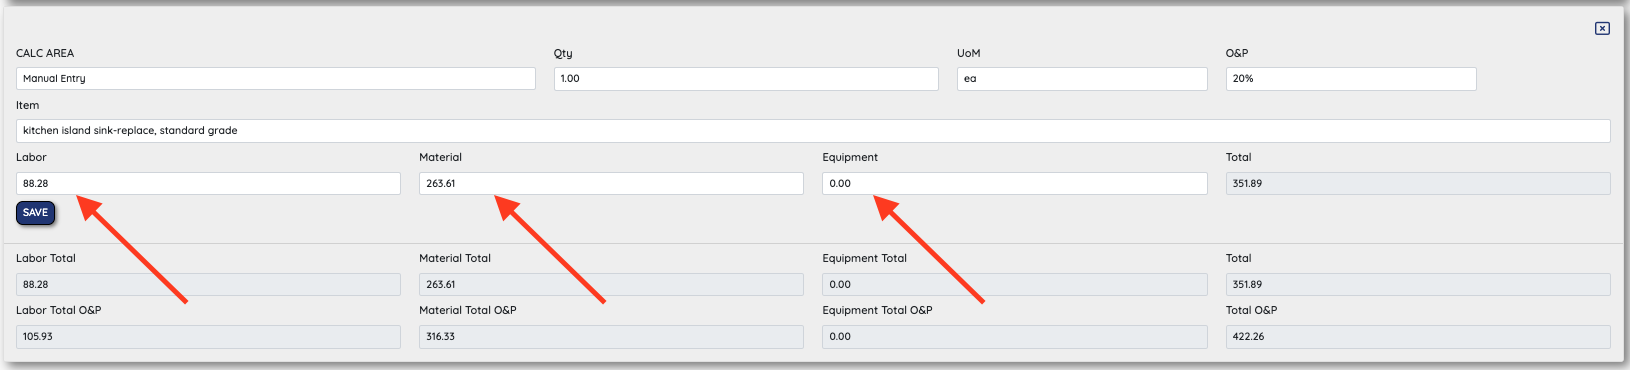
There will be scenarios that come up from time to time that require you to adjust the labor price or the material price for a specific line item. Maybe the client wants a very expensive kitchen faucet or chandelier. Bid Builder "zip code average" pricing will need to be adjusted to meet these needs. The good news, you can adjust any and all aspects of your bid and its pricing.
Watch this short video or follow the steps below.
Step #1: In the Estimating tab find the line item that you would like to edit and press the Pencil icon.
Step #2: Select the estimate line item, housed within the narrative, that you'd like to edit.

Step #3: Update the labor price, material price, equipment price, O&P, and more. There is a full range of flexibility in this section. When you're ready click save to update the line item.
Yes! Adding line items to multiple areas at a time can and will speed up your estimating and get numbers to your customers faster! And it's easy! Just select the areas you want to add line items too and get to it.
Watch this short video or follow the instructions below!
Step #1: Find your way to the estimating section of Bid Builder. Note: you MUST create all of your Areas before this feature will work.
Step #2: Toggle all of the areas you would like to add line items to.
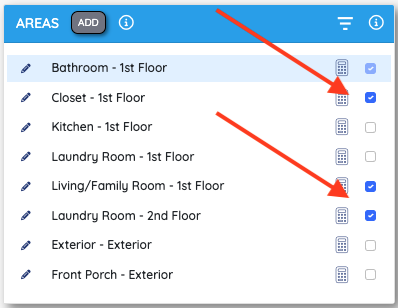
Step #3: Add line items like usual. All selected areas will receive all line items selected during this time.
bidbld's Trade/Narratives are unique to bidbld alone. We have searched the Pricebook to find the most frequently used line items so that you don't have to. Not only that, we've organized, combined line items, and categorized each one to make estimates fast and ready to be used on Renovation Loan projects. On top of that, each line items has been assigned to specific units of measure to make sure that sqft, lnft, or qty is used when needed.
Watch this short video to learn how to use bidbld's Narrative/Trades!
The Craftsman Price Book can be used when a specific line item or a BB Narrative/Trade cannot be found or is not quite right for your needs. The Price Book line items and pricing come from its National Database of contractor and sub-contractor pricing. This pricing is boiled down to the zip code so you can rest assured the prices are accurate. It is more cumbersome to build a bid with the price book but adding some of these line items to custom templates could be of use.
Watch this short video on how to use the Price Book!
Yes you can. If the BB Narrative/Trades and the Price Book do not work, you can switch to a manual entry and create any line item you'd like. Measurement integration is not an option with manual entries but you have complete freedom to enter any description, labor price, and material price you want. When adding manual entries you will also be asked to add a trade to the line item. This will help us categorize your line item on the summary page and if used on a renovation loan project.
Watch this short video on inputing Manual Entries!
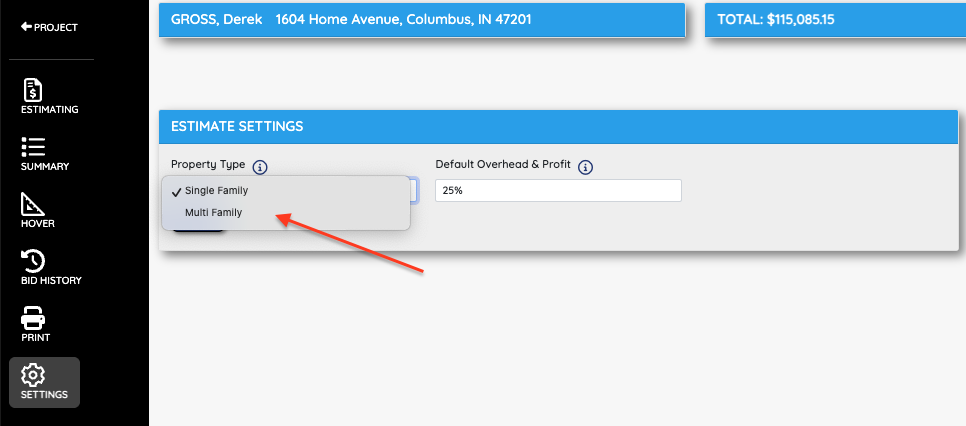
If you need to create a Bid for a multi-family property, we've got a solution for you. Use the settings tab to convert your project to a multi-famly project. This will allow you add areas to both units and levels to better organize your bid.
Watch this short video or follow the instructions below!
Step #1: On the setting pages, select the drop down for Multi-Family. After selecting the number of units, press Update.
Step #2: When creating new areas, you will be given an additional field to select a Unit. This will be done for each area to keep your units separate when building your Bid. You can filter your units on the summary page to make understanding the bid more clear for your customers.
See Our Construction Software in Action
Want to see how fast and easy bidding can really be? Watch a quick walkthrough of bidbld in action — from building an estimate with real-time cost data to sending a clean, client-ready PDF. No fluff, no learning curve, just real tools designed for real contractors.